
Why Convert PNG to SVG? The Benefits Explained
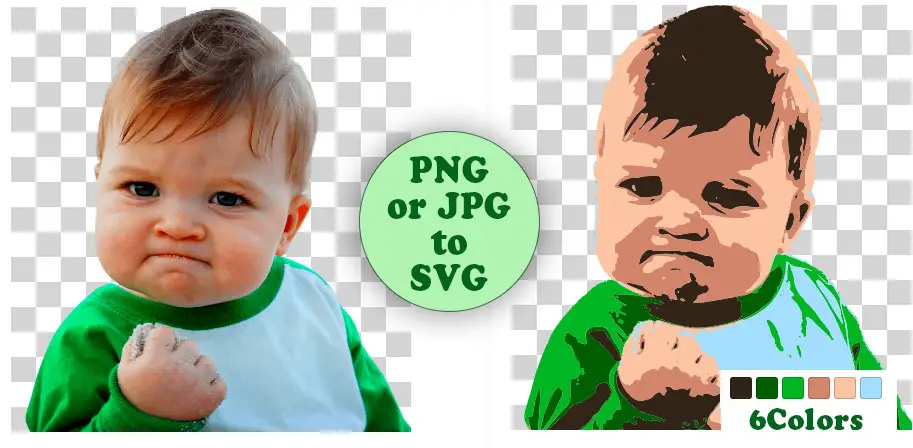
If your PNG logo looks pixelated when enlarged, or you found a great design only available as a PNG, converting to SVG is the solution. SVG (Scalable Vector Graphic) files are built with mathematical equations, not pixels, so they scale to any size without losing clarity.
Crafters using machines like Cricut or Silhouette know the frustration of blurry cuts from low-resolution images. SVG files ensure clean, crisp cuts for any project size. Laser engraving also demands clear, vector-based images for professional results. I've personally seen a huge difference in my own crafting projects since switching to SVG files.
The benefits don’t stop there. On the web, SVGs are incredibly versatile. They generally have smaller file sizes than PNGs, meaning faster loading times for your website. They’re also responsive, adapting to different screen sizes without becoming blurry or distorted. Plus, you can easily change the colors of elements within an SVG using CSS, something you can’t do with a PNG. This flexibility is hard to beat.
PNGs work well for detailed photographs but pixelate when resized significantly, looking unprofessional. SVGs, being non-pixel-based, avoid this limitation, making them ideal for scalability, clarity, and editing flexibility.
Understanding Vector Graphics: What Makes SVGs Special
Raster and vector graphics differ significantly. A raster graphic, like a PNG or JPG, is a mosaic of tiny squares called pixels. Zooming in reveals these squares, causing blurriness. A vector graphic, like an SVG, is a set of instructions for drawing the image.
SVGs use mathematical equations for lines, curves, and shapes, instructing the computer how to draw the image at any size. It's like describing a circle by its radius (X) rather than listing every point. This construction method allows for infinite scaling.
Since SVGs aren't pixel-based, their file sizes are often smaller, particularly for simple designs. Editing is also much easier. You can open an SVG in a vector editor like Inkscape and modify any element—colors, shapes, sizes—without quality loss. This control isn't possible with raster images, making SVGs powerful for designers needing frequent customization.
5 Free PNG to SVG Converters: A Head-to-Head Comparison
Convinced about SVG benefits? Here's how to convert your PNGs. Several free options exist. Let's compare five popular converters.
SVGTrace is a solid online option. It’s completely free and easy to use – simply upload your PNG and click "Convert". The quality is generally good for simple images, but it can struggle with complex designs. I found that it sometimes produces a lot of unnecessary nodes, making the SVG file larger and more difficult to edit. It doesn't have a background removal tool built in.
Adobe Express offers a surprisingly capable free vector converter. The process is very straightforward: upload, download. It’s quick and easy, and the results are usually quite good, especially for logos and simple graphics. It integrates well within the Adobe ecosystem if you're already using their products. However, it can be limited in terms of customization options.
Vector Magic is often touted as one of the best converters, but the free version is actually a limited trial. You can only convert a certain number of images, and the output is watermarked. Still, it’s worth testing if you need a very high-quality conversion and are willing to pay for the full version. It excels at handling complex images and producing clean, scalable SVGs.
Online-Convert.com is a versatile online tool that supports a wide range of file conversions, including PNG to SVG. It offers some basic customization options, such as adjusting the color palette and setting the output resolution. The quality is decent, but it can be a bit slow, and the interface is cluttered with ads. They do not have a background removal feature.
Convertio is another popular online converter. It’s easy to use and supports a wide variety of file formats. The conversion quality is comparable to Online-Convert.com, and it also offers some basic customization options. The main drawback is the file size limit – you can only upload files up to 100MB with the free version. It also lacks integrated background removal.
- SVGTrace: Best for quick, simple conversions. Limited customization.
- Adobe Express: Easy to use, good quality for logos. Fewer advanced options.
- Vector Magic: Highest quality (paid version). Limited free trial.
- Online-Convert.com: Versatile, but cluttered interface. Moderate quality.
- Convertio: Simple, with file size limitations. Decent quality.
PNG to SVG Converters Comparison - 2024
| Converter Name | Ease of Use (1-5 stars) | Conversion Quality (1-5 stars) | File Size Limit | Background Removal? | Price | Notes |
|---|---|---|---|---|---|---|
| SVGTrace | 3 | 3 | 5MB | No | Free | Good for simple conversions. Offers some control over vectorization settings, but interface can be slightly dated. |
| Adobe Express | 4 | 4 | No stated limit (generally <5MB recommended) | Basic | Free | Very easy to use, quick conversion. Requires an Adobe account. Best for simpler images. |
| Inkscape | 2 | 5 | No practical limit | Yes (manual) | Free | Steeper learning curve, but offers the highest quality conversions and full manual control over vectorization. Desktop software. |
| Vector Magic Online | 3 | 4 | 2MB (Free Trial) | Yes (Paid Feature) | Paid (Free Trial Available) | Excellent conversion quality, especially for complex images. Free trial is limited. Background removal is a paid feature. |
| Online-Convert.com | 3 | 3 | 100MB | No | Free/Paid | Supports batch conversion and various output options. Free version has ads and limitations. Conversion quality is decent for basic images. |
| Convertio | 4 | 3.5 | 100MB | No | Free/Paid | Simple drag-and-drop interface. Supports many file formats. Free version has daily usage limits and slower speeds. |
Data sourced from AI research — verify before making decisions
Step-by-Step: Converting PNG to SVG with Inkscape (Desktop)
While online converters are convenient, for the best results, especially with complex images, I strongly recommend using Inkscape. It’s a free, open-source vector graphics editor that provides a level of control you simply won’t find online. This guide will walk you through the process step-by-step.
Step 1: Import your PNG. Open Inkscape and go to File > Import. Select your PNG file and click "Open’. A dialog box will appear – leave the settings at their defaults and click ‘OK".
Step 2: Select Trace Bitmap. With your PNG imported, select it. Then, go to Path > Trace Bitmap. This opens the Trace Bitmap dialog box. This is where the magic happens.
Step 3: Adjust Trace Bitmap Settings. This is the most important step. Experiment with the settings to get the best results. "Single scan’ is good for simple images, while ‘Multiple scans’ is better for more complex ones. Adjust the ‘Threshold" value – higher values will result in fewer details, while lower values will capture more. I usually start around 0.4 and adjust from there. The number of colors is also important – reduce it for simpler graphics. Preview the result to see how it looks.
Step 4: Convert to Path. Once you’re happy with the preview, click "Apply". Inkscape will create a vector path on top of your PNG. Now, select both the PNG and the vector path (hold Shift while clicking) and go to Object > Ungroup. This separates the vector path from the original image. Delete the PNG – you only need the vector path.
Step 5: Clean Up the Vector Image. The resulting vector image may contain unnecessary nodes and paths. Use the Node tool (press N) to simplify the image. Remove unnecessary nodes by clicking on them and pressing Delete. Smooth out curves and refine the shapes. This is where you really fine-tune the image.
Step 6: Export as SVG. Finally, go to File > Save As. Choose "Plain SVG’ as the file type and click ‘Save". You now have a clean, scalable SVG file. The default settings are usually fine, but you can adjust them if needed.
- Import your PNG into Inkscape.
- Select the PNG and go to Path > Trace Bitmap.
- Adjust the Trace Bitmap settings (Threshold, Colors, Scans).
- Apply the trace and ungroup the resulting objects.
- Delete the original PNG image.
- Clean up the vector image with the Node tool.
- Export the image as a Plain SVG file.
Optimizing Your SVG: Settings for Cricut, Silhouette, and Web
Converting to SVG is just the first step. To get the best results for your specific application, you may need to optimize the file. For Cricut and Silhouette cutting machines, simplifying paths is crucial. Too many nodes can cause the machine to struggle and produce a messy cut. In Inkscape, use Path > Simplify to reduce the number of nodes. You may also need to "weld" overlapping shapes together to create a single, continuous path.
For web use, minimizing file size is important for faster loading times. Remove any unnecessary elements or paths. Use a tool like SVGOMG (https://jakearchibald.github.io/svgomg/) to compress the SVG file without losing quality. This tool removes metadata and optimizes the code.
Avoid overlapping paths and tiny details that might not render correctly on some devices. Always test your SVG on different browsers and devices to ensure it looks as expected. A "clean" SVG code is easier to maintain and less prone to errors. Tools like SVGOMG can help you achieve this.
Troubleshooting Common PNG to SVG Conversion Problems
Conversion isn't always perfect. Here are some common problems and how to fix them. Blurry SVGs: This usually happens when the threshold is set too low during tracing. Increase the threshold and try again. Also, ensure you're using a high-resolution PNG as your source image.
Incorrect Colors: This can occur if the color palette is not set correctly during tracing. Experiment with different color palettes in Inkscape. You may also need to manually adjust the colors after the conversion. Missing Details: If important details are lost during the conversion, lower the threshold and try using "Multiple scans" in Inkscape.
Overly Complex Paths: As mentioned before, too many nodes can cause problems. Use Path > Simplify in Inkscape to reduce the number of nodes. Issues with Specific Converters: If you're having trouble with a particular converter, try a different one. Each converter has its own strengths and weaknesses. Sometimes, a simple restart of your browser or computer can also resolve the issue.
- Blurry SVG: Increase threshold, use high-resolution PNG.
- Incorrect Colors: Adjust color palette in Inkscape.
- Missing Details: Lower threshold, use multiple scans.
- Complex Paths: Simplify paths in Inkscape.
- Converter Issues: Try a different converter.
Beyond Conversion: Editing and Enhancing SVGs
Once you've converted your PNG to SVG, the fun doesn't have to stop there. You can further edit and enhance the SVG using a vector graphics editor like Inkscape or Vectr (https://vectr.com/). With these tools, you can easily change colors, add text, manipulate shapes, and generally refine the SVG to your liking.
Inkscape is a more powerful and feature-rich editor, while Vectr is simpler and more user-friendly. Both are free and offer a wide range of tools for creating and editing vector graphics. You can find tons of tutorials online to help you learn the basics. If you’re looking to explore more about SVG editing, check out other resources on NiceSVG.
Where to Find Free SVGs (and When to Convert)
Sometimes, it's more efficient to use a pre-made SVG file rather than converting a PNG. NiceSVG offers a vast library of free SVG files for a wide range of projects (link to NiceSVG library). You can find everything from logos and icons to patterns and illustrations.
When should you convert a PNG to SVG? If you have a unique image that you can’t find anywhere else, or if you need to customize an image extensively, converting is the way to go. But if you’re looking for a common design, it’s often faster and easier to download a pre-made SVG.
Top Free PNG to SVG Converters (2024)
- SVGTrace - A popular online tool specifically designed for tracing bitmaps into scalable vector graphics. It offers various settings to control the conversion process. Visit SVGTrace
- Adobe Express - Adobe’s free online vector converter allows for quick PNG to SVG conversions with instant download. Requires a free Adobe account. Convert with Adobe Express
- Inkscape - A powerful, free, and open-source vector graphics editor. While it’s desktop software, it provides excellent control and quality for converting PNG images to SVG. Download Inkscape
- Vector Magic - Offers both online and desktop solutions. While a paid service exists, Vector Magic provides a limited number of free conversions. Try Vector Magic
- Online-Convert.com - A versatile online converter that supports numerous file types, including PNG to SVG. Offers customization options for the conversion. Use Online-Convert.com
- NiceSVG Free Library - Looking for pre-made SVGs instead of converting? Explore our extensive collection of free SVG files for your projects! No conversion needed! Browse Free SVGs


No comments yet. Be the first to share your thoughts!